Girls from early childhood like beautiful hairstyles. First with a bunch of ribbons, colored elastores and hairpins, and then with unsurpassed Hollywood curls and bouffant. You can make a beautiful styling with good styling tools only in the salon, but if you don’t have time to visit it at all, you can use an improvised device - a Twister hair clip.
With this functional accessory, you can not only put a sticking strand, but also make a haircut worthy of an evening out. Twister, in capable hands, easily replaces Babette, a tiara, and indeed any solid hair ornament. It can pin up hair, using shells instead of a traditional hairpin. In other words, it is a universal accessory for all occasions.

What it is
Hairpin Twister gained particular popularity in the 90s, just at the time when the fashion for non-standard and diverse hairstyles appeared. The girls wanted to change, without making any special efforts for this, and the clip with the wire, which bends in any direction, contributed to this very well.

The advantage of this hair clip was that it perfectly fixed even the longest hair, and externally resembled a stylish decoration. It could be covered with velvet, silk, lace, decorated with beads and rhinestones, and for volume it can be supplemented with foam rubber.

The backing has the styling functions, since after many hours of wearing you can get twisted strands. With the help of Twister, the girls learned to do more than twenty hairstyles, radically changing their images. Today this stylish accessory is back in the fashionable arsenal and every self-respecting girl should use it correctly.
How to use
For a start, I would like to note that the Twister clip is designed exclusively for long hair and if their length does not reach at least the shoulder blades, a normal hairstyle is unlikely to work. Presentable hairstyle can be done only if the hair will be carefully combed over the entire length. If the previous condition is met, and the hair length is suitable, you can proceed to the most important thing - the creation of hairstyles.

Do it better according to the instructions:
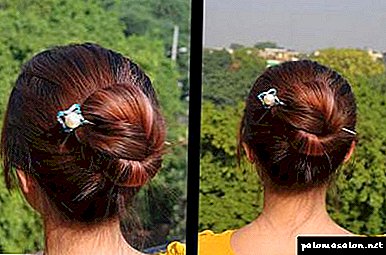
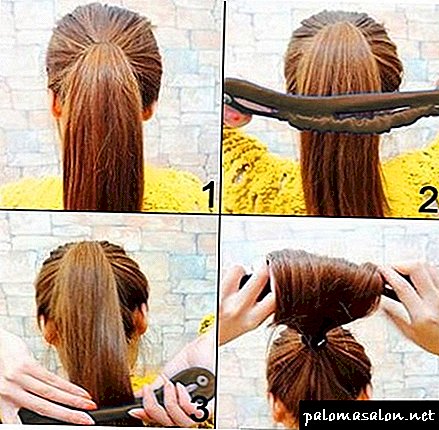
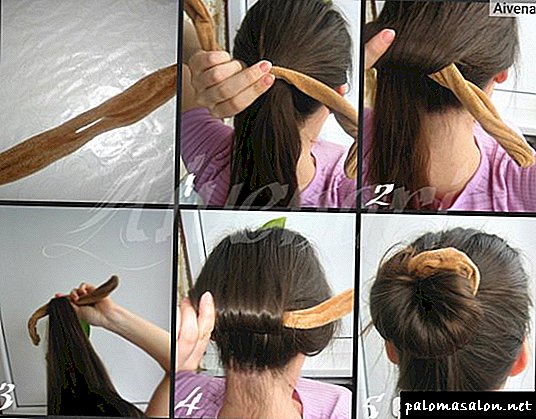
- We collect hair on the back of the head as if we want to make a tail, but we do not fix it with an elastic band. Make sure that your hair is well smoothed at the back of your head, otherwise the hairstyle will not look very neat.
- We take a hairpin and stretch the hair through a special hole. Consider that the hair should be neatly distributed around the perimeter of the hole - from edge to edge.
- If you have a cascade hairstyle and hair in different areas differ in length, the hairpin will have to be brought to the place where the shortest strand ends, and then fixed.
- We start to scroll the Twister, thus fixing them tightly in the hole. We carry out a hairpin from the neck to the ends, gradually scrolling, and then we come back, spinning the hair itself under the bottom.
- When we finally brought the hairpin to the base of the tail, it remains beautiful and neatly fasten it in the hair. This can be done in the form of a bun or a bagel - as you like.
This version of the hairstyle can be called the most simple and homely because it is hardly suitable for an evening out.
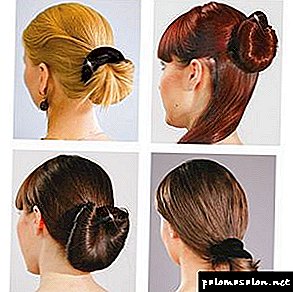
With the help of hairpin Twister you can create two dozen hairstyles, but the most popular are just a few of them:
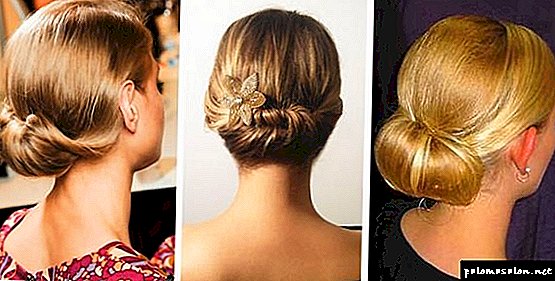
- A bunch. Carefully combed hair is collected in the tail at the level of the future beam and thread through the hole hairpins. We twist hair, trying to prevent the strands from falling out, and when we reach the edge, we bend the ends. You can twist them together under or above the beam.

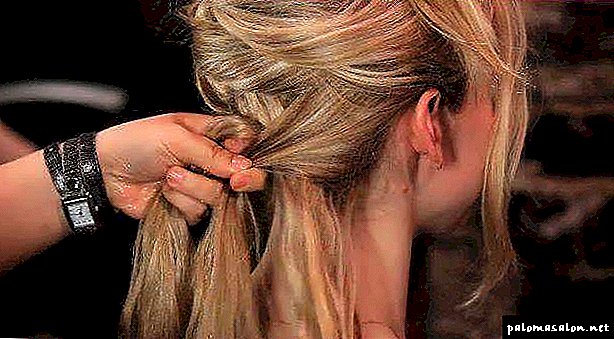
- Tail with a harness. First we make a horizontal parting, dividing the occipital and crown region in half. The tourniquet will consist of hair that was left on the back of the head. Hairpin temporarily fasten the hair on the top of the head, and part of the hair from the back of the head, meanwhile, twist into Twister. After that, remove the hairpin and thread the "upper" hair through the Twister ring.

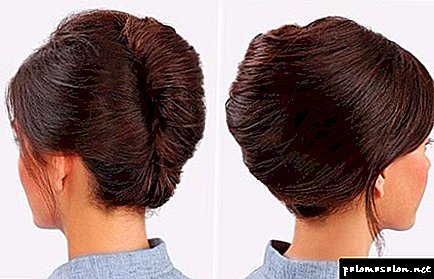
- Shell. We comb the hair and pass it through the hairpin, placing it vertically. From the same position we begin to scroll the hair, and when the hairpin moves to the back of the head firmly fix the ends of Twister.
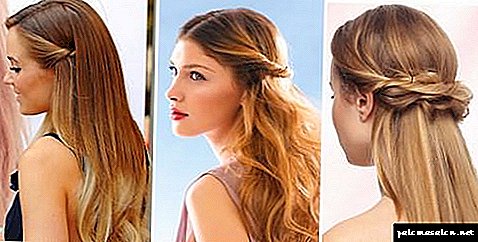
- Malvina We comb through all the strands and form a parting that visually separates the top and back of the head into two halves. We fix the bottom part of the hair with a shell, and start to wind the upper part on the Twister. When the hairpin will be brought to the head, its edges will need to be fixed. Hair from the bottom must be left flowing.

As you can see, the second and fourth hairstyle are created on a similar principle, only you need to act exactly the opposite. Evening images with Twister are created by the type of Malvina, but with some changes. So, you can simply twist the lower part of the hair, and twist the top into a bundle.
Using hairpin twister hairpins
Nowadays, this accessory is gaining popularity again. With this thing you can do a lot of everyday and festive hairstyles, you just need to turn on the fantasy. Fashionistas all over the world appreciated this hairpin for ease of use, time saving and endless possibilities for experimentation.
Owners of long hair know how difficult it is to make a beautiful hairstyle, so they often leave them loose, make a tail, a braid or pin with hairpins. If the representatives of the weaker sex need to make laying more complicated, they use the services of masters from the salon or a hairdresser.
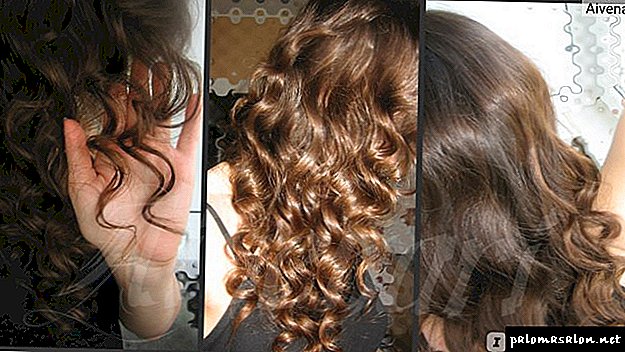
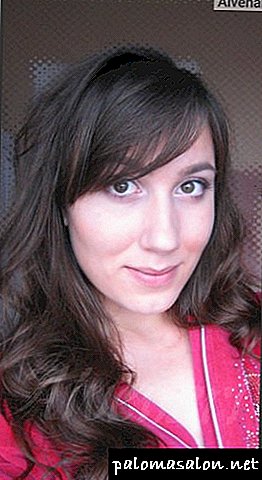
Twister is indispensable during sports, as it helps to securely fasten the strands without injuring them. The styling made using this accessory will be in its original form all day and will not require additional adjustments. The undeniable advantage of the hairpins is light, winding curls that appear on soft hair after a few hours of wearing it.
With the help of a twister in a matter of seconds, you can cope with a shock of thick, long and unruly curls, transforming them into a refined, current hairstyle.
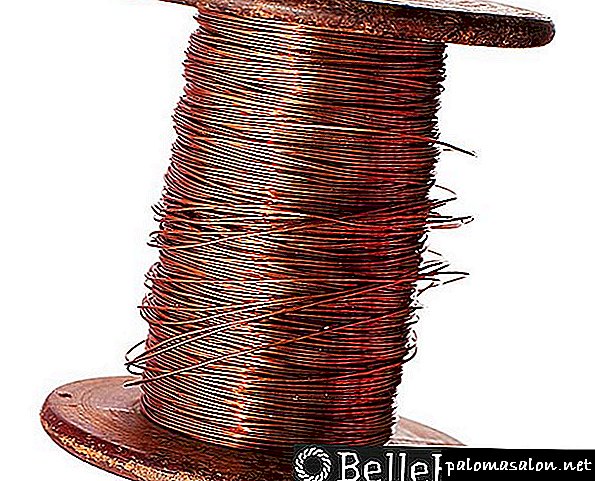
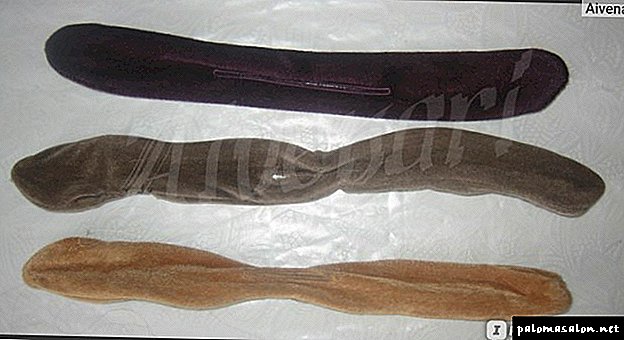
 Prikolka is a frame made of strong and flexible wire, covered with a fabric of various texture, color and pattern. To create a more voluminous hairstyle decoration supply with foam liners.
Velvet, cotton and other fabrics are used as the fabric for the frame. Materials are monotonous and with a print in peas. The latter helps to make the image frivolous and perky. Some accessories are decorated with a small floral print or other ornament. To give the hairstyle a beautiful and solemn look, the barrette is decorated with rhinestones, pearls, feathers, beads, laces, etc.
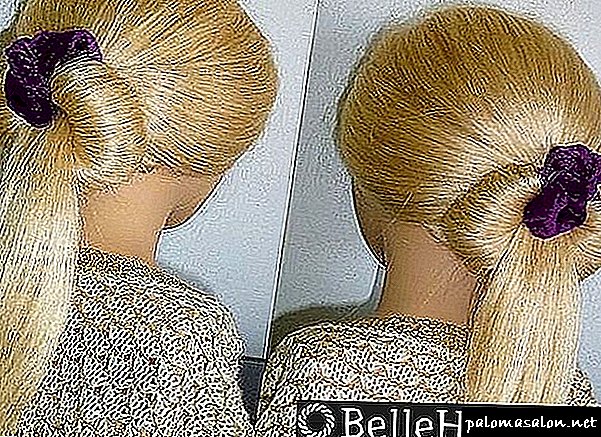
Twister is needed in everyday life. With it, you can quickly and securely fasten the hair in an elegant bun. He will help to collect naughty curls in a roller or shell and go to a business event. Hairdo will ideally keep the whole day, and in the evening after removing the hairpin hair will fall on the shoulders of elastic curls, like after curling on curlers.
Most often you can see on sale twisters, made in black, dark blue, white and other shades. The snow-white version is the most elegant, but impractical. Black barrette perfectly fits any image and combines with different hair color. In addition, dark colors are less noticeable.
The hairpin twister is made of thin wire, has an oval shape and is provided with a hole in the center, but there are also other variations of this decoration. For example, for long hair should be purchased massive models with a wide hole in the center. For medium and short fit small diameter with a small hole.
Advantages and disadvantages of hairpins
The advantages of hairpins include:
 the possibility of its use on straight and curly hair of any length,
- universality (suitable for girls and women of any age),
- the ability to create complex styling without the use of studs and pins,
- a simple principle of action (fixed on the head of hair, then twisted to the head and fixed in various ways).
 the possibility of its use on straight and curly hair of any length,
The disadvantage of the hairpins is that it will not be able to cope with a very thick and heavy “mane”, but the way out can be found here is the use of two decorations at the same time.
Making a twist sophist with your own hands
Show fantasy in full, you can not only when creating hairstyles. Fashionable barrette is not necessary to buy. It can be done independently at home.
To make a twist sophist you will need:
- copper wire,
- Scotch,
- pliers,
- upholstery fabric.
 The wire is made of a ring, the diameter and length of which depend on the volume and length of the hair. To obtain a solid base wire tightly wrapped with tape. The cover needs to be sewed in advance. The hole in the case is made depending on the diameter of the frame. The frame is bent and inserted into the blank, the hole is sewn up, and the ends of the barrettes are decorated. Twister with his own hands ready.
The cost of a finished hairpin is quite budget, but if you want to get an exclusive, then make it.
What hairstyles can be done
Twister is intended only for long hair. If the length is shorter than the shoulder blades, then a good hairstyle is unlikely to work. Remarkable and neat hair can be done if the locks will be well combed along the entire length.
Haircut should be done step by step:
 We collect hair on the back of the head, but do not fasten, they should be perfectly styled, otherwise the hairstyle will look messy.
- We take a hairpin and stretch the hair through the hole, distributing the strands around the perimeter of the hole from edge to edge.
- Scroll the hairpin, fixing the hair tightly inside the hole. We carry out a hairpin from the neck to the ends, gradually scrolling, then go back, spinning the hair under the bottom.
- When the hairpin is brought to the base of the tail, you need to beautifully and gently fasten it in a hair-do. This should be done in the form of a bun or bagel (as someone you like more).
 We collect hair on the back of the head, but do not fasten, they should be perfectly styled, otherwise the hairstyle will look messy.
Creating a bundle of hair
 Classic bunch Suitable for business ladies, romantic girls and schoolgirls. Hair on the back of the head should be collected in a strong bundle.
Comb your hair well, skip it in the decoration and evenly distribute it. Twist hair gently, starting from the tips. In this case, you need to pay attention to the strands are not knocked out of the common tail. After that, fix the ends of the barrette.
This bundle can be performed both at the neck itself and high on the crown. The ends of the barrette can be twisted on or off. To create a more festive look, twist side strands or an accessory in the form of a flower by means of a curling iron and insert it into a bun.
Fringed tuft It is a type of styling, in which the barrette is twisted not from the tips, but from the middle. The remaining strands create a fringe around the beam. The tips should be slightly twisted, so that the hairstyle looks volumetric or elegant, and you can leave it as it is.
Bump lump is another type of hair. The combed strands must be gathered into a high tail using a twister. The hairpin should be moved closer to the tips, then begin to gradually wrap towards the crown. When the decoration reaches the head, its ends need to be fixed.
Other simple options
With the help twister can create many hairstyles. The most popular ones are:
 Tail with a harness. First you need to make a horizontal parting, dividing the curls into two parts (the larger the lower part of the hair, the tighter the flagellum will be). Flagellum should consist of those strands that were on the back of the head. It is necessary to pin the hair on the top of the head with a clip, and twist part of the strands from the occipital region into a twister. Then remove the clamp and thread the hair from the top of the head through the ring.
- Malvina. Combing all the strands and parting, then create a horizontal parting, dividing the head and occipital part into 2 parts. Fasten the curls with the shell to the bottom of the head, the rest of the hair begins to wind on the hairpin to the neck. After this, the edges of the decoration are fixed. Strands of the lower part should be left loose.
- Shell. Well comb hair and draw them through the hole barrettes, putting it vertically. From this position we begin to scroll the hair until the twister moves to the back of the head. At the end we fix the edges of the decoration.
 Tail with a harness. First you need to make a horizontal parting, dividing the curls into two parts (the larger the lower part of the hair, the tighter the flagellum will be). Flagellum should consist of those strands that were on the back of the head. It is necessary to pin the hair on the top of the head with a clip, and twist part of the strands from the occipital region into a twister. Then remove the clamp and thread the hair from the top of the head through the ring.
 Evening images with a sophist twist are created according to the type of malvina, but with slight modifications. You can simply twist the lower part of the hair, and twist the top into a bundle.
With this accessory you can create Hollywood curls. To do this, twist the wet strands into a hairpin, and after drying dissolve. It should be borne in mind that the result will depend on how the hair was twisted, the perfect result may not work out the first time.
Tips for using a sophist hairpin for medium and long strands
The fashion for long braids has returned, and with it this original accessory. It is easy to use a hair twister: curls or individual strands insert hairpins into the slot and twist on it. After practicing for some time, you can do hair with a twister in minutes. Unlike clips and rubber bands, which after a while slip from the beam, the hair twist fixes the hair well, which is why active ladies who play sports or dance are especially needed.
 Hairstyle using hairpin twist
Using electric hairpin hair clip for long hair
Before you do your hair using a twister, read the tips for using it:
- Optimal for creating hairstyles using sophist-twist are long or medium curls.
- It is easier to use a twist on hair of the same length, since shorter strands will fall out and it will be difficult to twist them onto a hairpin.
- If the curls are cut along the entire length, you should be careful with the use of a twister: the split ends will come out of the smooth roller and spoil it.
 Instructions for creating hairstyles
Hairstyles with gum
With this original accessory you can make various hairstyles, the simplest of which is a bun. With this option, you can quickly pick up long hair, securely fix them, and at the same time look elegant.
 First you should wash your hair and comb it thoroughly.
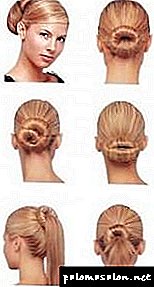
Making a bundle with a twister is simple:
- Clean curls are carefully combed, assembled into a bun, threaded through hairpins, and spread along the entire length of the hole.
- A twist sophist begins to gently wind up, toward the head. Make sure you get a tight roller, and the individual strands do not fall out of the slot.
- After the whole bundle has twisted into a roller, and the twist has rested its edge against the back of the head, the ends of the barrette are twisted down and fastened.
 Bundle with a hairpin twist
Tip! A very feminine version can be made according to the previous algorithm, if the roller is twisted in the downward direction, and the ends of the hairpin are bent upwards.If the beam is threaded into the slot not horizontally, but vertically, we get the original version, called Flamenco.
As you can see, there are many variants of hairstyles using this accessory. On women's forums, you can find detailed instructions with illustrations, showing how to create a hairstyle with a sophist twist step by step.
 Haircut option with hairpin twist
Do-it-yourself accessory: we do the twister yourself
A wide range of these topical accessories is on sale: all possible colors upholstered in various fabrics and even made of plastic. But, if you want to be original, you can make a twist sophist with your own hands.
 You can make a hairpin yourself
For work you will need:
- wire (aluminum or copper),
- upholstery fabric
- pliers,
- Scotch.
 Coil of Copper Wire
A coil of wire is wound into a ring with a length of 20-30 cm. The longer and thicker the hair, the harder the roller will be, and the more turns of the wire you need for the frame. When the frame is formed, it is wrapped with scotch tape on top to make the structure monolithic.
A cover is sewn from the fabric, but the slot in the middle is not crammed - we will insert a wire frame into it. The frame is bent and inserted into the case, the slot is sewn up, and the ends of the hairpins are decorated according to the taste of the owner - the hair twister is ready with your own hands.
Editorial Board
If you want to improve the condition of your hair, special attention should be paid to shampoos that you use.
A frightening figure - in 97% of shampoos of famous brands are substances that poison our body. The main components, due to which all the troubles on the labels are designated as sodium lauryl sulfate, sodium laureth sulfate, coco sulfate. These chemicals destroy the structure of the hair, the hair becomes brittle, lose elasticity and strength, the color fades. But the worst thing is that this stuff gets into the liver, heart, lungs, accumulates in the organs and can cause cancer.
We advise you to abandon the use of funds in which these substances are located. Recently, experts of our editorial staff conducted an analysis of sulfate-free shampoos, where the first place was taken by funds from the company Mulsan Cosmetic. The only manufacturer of all-natural cosmetics. All products are manufactured under strict quality control and certification systems.
We recommend to visit the official online store mulsan.ru. If you doubt the naturalness of your cosmetics, check the expiration date, it should not exceed one year of storage.
Shell (Flamenco)
- Pre-combed curls are inserted into the hole of the fashion accessory, after which it gently moves towards the tips.
- Next, the twister rotates to a vertical position along the head.
- Then the strands gradually twist to the right or left side, and the ends of the barrettes bend.
- The combed strands are also threaded into the twist sophist, then it moves almost to the tips.
- After that, we begin to gradually curl the curls inside. At the same time it is necessary to ensure that their ends do not slide off the barrette.
- Turning the beam on one side, form a shell, while the ends of the sophists twists are fixed among themselves. Below are the photos.

Bump lump
- The combed curls must be picked up in a high horse's tail with the help of a hairpin.
- Then move it closer to the tips, and then begin a gradual twisting towards the top of the head, until the twister fits against the surface of the head.
- Secure the ends of the accessory together.

Fringed tuft
- Curls, as described in the previous hairstyle, you need to collect in the tail and put in the hole accessory.
- After that move it on mid-length strandsgradually spinning.
- Further, the ends of the barrettes are interconnected, and a hair fringe is formed around the beam. Hairstyle is ready.
Scratched strands horizontally need to be divided into 2 parts. It should be borne in mind that the larger the lower part left by you, the thicker the harness will be.

The upper part for a while is better to remove the "crab" so that it does not bother us. The bottom one is inserted into the accessory hole and twists in a standard pattern.

When the twist sophist approaches edge to the head, the upper strands fall on her. After that, the ends of the barrettes are fixed together.

Malvina's hair
Strands, as in the previous hairstyle, are divided into 2 parts horizontally. The bottom remains uncool, the top - is collected in a bundle.

With a hairpin twister you can experiment every day, embodying already known and independently inventing new hairstyles. At the same time a great result is visible almost immediately.

Create a twist sophist hairpin
Show your imagination is fully possible when creating such an accessory with your own hands. In addition, it can be an original and inexpensive gift to your loved ones.
To create a hairpin, we need:

- Copper wire will form the basis of our future design. The number of her skeins depends on the density of the curls. The greater their number, the more reliable it will be mounted on the hair. So, in diameter, our future barrette should be about 20-30 cm.
- The resulting ring, gently wrap tape around the perimeter.
- Insert the wire into the pre-stitched case of our future twister. Do not forget about the hole. Our hairpin is ready. If desired, it can be decorated with various decorative elements.

Twister allows girls around the world to create new images every day in minutes. In addition, it is simply indispensable on trips when there is no time and opportunity to put curls. Finally, an important advantage is her low cost, which allows fashionistas to purchase more than one hairpin to any wardrobe for all occasions.

Twist Sophist: 3 simple solutions for long curls
The hair clip for a twister or twist sophist was popular in the 90s. This convenient and practical accessory had many admirers, but the fashion for it did not last long. Long curls, ideal for hair with a twister hairpin, have ceased to be relevant, they were replaced by a little torn strands of medium length, and the twist for the hair was forgotten.

Hairpin twister
Twister hair bundle
All bunches, as a rule, are hairstyles light. If you use a “twister” when creating a beam, it will take only two minutes. This is exactly what girls need in a hurry to school.
The first step is to remove the top strands in the direction. So that they do not interfere in the process of creating a beam, they are tightened with a rubber band.
All other curls push in the "twister" hole. It will hold the hair well if it is bent on both sides.
A special hairpin with a hole must be pulled to the ends of the hair. Now you need to release the strands tucked into the side and lower them onto the strands twisted with a barrette.
The ends of the hair should be crossed with each other in the "twister", then give them the desired shape.
Using the "twister", you can make another simple hairstyle. This original bundle is made for both medium and long hair.
Before collecting the curls in a bun, they should be brushed and pushed through the “twister” hole. Then the strands need to be fixed, that is, bend the “twister” on both sides.
Then the barrette should be shifted to the ends of the strands, then wrap it together with the strands, like a coil. Then the ends of the barrettes need to be stapled to each other. "Twister" can be issued in the form of a bow.
With the help of "twister" can be done and the side beam. This hairstyle for girls will look at times more interesting.
Interesting bagel hairstyle
And what hairstyles can be done using a donut? This item will greatly facilitate the creation of the beam.
In addition, the beam will turn out beautifully rounded. This hairstyle will interest many girls, because it is done in five minutes.
First, all the curls must be gathered together at the top of the head and tightened with a rubber band. On the tail made, you need to put on a bagel and fix it with stealth.
Then the hair of the tail is divided into three strands. Two clean in hand, and one back. The strand, which was taken to the back of the head, you need to comb and fix a little below the donut.

Side strands should be twisted around a bagel, and in front they should be crossed with each other. The tips of the hair should be hidden under the bagel in the back and hooked with stealth.
The hairstyle will look slightly different if weave pigtails from the side strands.
To make them more magnificent, they can be pulled out to the sides. Pigtails are laid in the same way. Then they can be decorated with beads or ribbon.
Hairstyle with weaving
Medium and long hair can be partially braided, leaving most of the hair loose.
These hairstyles are designed for girls who need to get rid of interfering strands. Therefore, with this hairstyle is very convenient to go to school.
Schoolgirl can do this hairstyle without the help of her mother. To do this, she needs to grab three wide strands from the left side of her head and weave a braid of each of them.
Then you need to take a strand from the ear on the right side of the head and also braid a pigtail. All made braids should be joined together at the back of the head, but not in the middle of the head, but closer to the right ear.
The ends of the order, connected by an elastic band, must be curled with a curling iron. Instead, from the loose strands of the resulting tail, you can braid a pigtail.
Braid these side braids girls can at least every day, going to school. So they will demonstrate their beautiful long curls and will look charming.
The secret of creating a volumetric double spit
The first thing the girl needs to throw all the strands on the right shoulder and collect them in the tail. Then the hair should be divided into two sections. From one, left, it is necessary to weave a braid.
Weaving should be normal, three-strand. But during it it will be necessary to let out from each strand which has appeared at the left, very thin strand. These released bundles of hair will need to be woven into the second braid.
The second spit should be as if connected by bridges with the first. Both beautiful braids should be tightened with one rubber band.
If before this carefully remove the gum from the base of the tail, the hairstyle will look a little different.
This hairstyle is considered very original. Especially she will like girls who go to school in 7-8 grade. Thanks to these unusual braids, they will be able to stand out among classmates.
Twisted strands
The lightest hairstyles are created by twisting the flagella. It is necessary to take note of schoolgirls who have long hair, but do not want to braid them in braids.
There are a lot of hairstyles in school and for every day with twisted strands. With the help of flagella, you can even twist your head like a hoop or rim.
Girls, students in high school, will arrange the next version of the installation, performed in several stages.
First of all, you need to take a small strand from the left temple, tightly twist it (left to right) and remove through the back of the head to the right ear. There it is necessary to hook the invisible.
Now you need to take the upper strand on the right and also twist it into a bundle (from right to left), placing it below the first.
Both bundles should fit snugly together. To do this, it is better to hook them on the right side with the invisible.
Then it is advisable to twist at least two more tows from both sides of the head. But it is important to twist them in different directions, that is, one harness is clockwise, and the other is against it.
The rest of the hair, if desired, is left unchanged or collected in an inverted tail. To make it, you need to split the hair over the elastic band, and in the hole formed, thread the side strands of the tail.
Spit in haste
If you do almost no time to style your hair, a girl can make a braid for herself without interlacing the strands. In such a simple braid it is easy to remove long and medium strands.
First, the entire head of hair should be removed back and grab the two broad strands from the sides. They need to put crosswise and start for loose hair.
After that, these two strands pull forward and cross again with each other.
So it is necessary to wrap the whole braid with strands. To fix the hair should be a thin elastic band.
This braid is made on the same side of the head.
In order to create a side braid to school easier, curls are pre-assembled in the tail.
This styling is great for every day. To make it, just a couple of minutes is enough.
Tail and netting
Many girls are attracted to pigtail hairstyles. But in braids often not all curls are braided, but only individual strands, which is why the styling looks especially elegant.
Typically, such styling is done on the basis of the tail.
So, first of all, all the middle curls are brought together at the bottom of the head. Then a little gum is pulled from the hair and creates a small hole in them.
The entire tail is pushed into this hole so that it becomes inverted. This is the perfect hairstyle for every day.
But to create a more original styling to school, before you make a tail, you need to braid two side thin braids.
With them the hairstyle for girls of middle school age will be much more interesting.
These braids together with loose hair also need to be collected in the tail and thread it through the hole above the elastic.
To give the tail volume, its loose locks must be slightly fluffed, and the pigtails slightly pulled out.
Tail on the side with a bow
This hairstyle is more intended for girls with thin curls. But the length of the hair is not very important, that is, schoolgirls with medium and long hair can do this styling.
Hair "bow" for every day also involves the creation of the tail, but not behind, but on the side of the head. The strands of this weak tail should be divided into two sections and from each of them a loop will be formed, threading it through the gum.
It is important that the elastic tightly held the loop, otherwise the hair will fall apart. Another note for this styling to school concerns the size of the eyelets.
They must be the same. And so they were lush, they are gently pulled to the side.
Options bows of hair set. Some create on the crown of the head, others on the tail. But whatever these "bows" are, it is desirable to decorate them.
The tail is sometimes divided into two strands, which twist the base of the "bow". The tips of the curls are fixed with crab pins. To create such a "bow" is better on a weekday.
And if the ends of the strands are not removed, and curl, then the hairstyle will be festive. Curly easier to form using curling. It is better that they are of medium size.
Various options: haircuts with hair on hairpins (38 photos) for any occasion
Tired of everyday life and the sad look of your hair? Do not despair, because you can give a solemn styling very easily. The thing is jewelry and hairpins, which will be used to create different styles. After all, hairstyles for hair on barrettes can give an image of elegance, solemnity, playfulness and vivacity.
The styling can look very stylish and original.
Pleases also that you can buy an accessory for every taste and wallet, because the price can be very different. In addition, it is very easy to use them, any girl can make an original hairstyle with her own hands.
Haircuts with different types of hairpins
Hairstyles for hair on hairpins - the best option for transformation. Easy to use is their main advantage. The following are the most popular styles of hairpins.

The modern market is replete with a variety of hair accessories
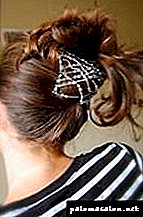
Twister is one of the most convenient accessories for creating cute styling. It will give pomp and solemnity, while remaining completely invisible. Twister remarkably holds the curls, so you can not be afraid that the styling will disintegrate.
Photos of the phased creation of "shells" using a twister
You can safely create hairstyles for medium hair with hairpins twister, for example, the classic "shell" will look neat and elegant.
- Carefully comb the curls.
- Collect strands in a low tail and fix the twister in a horizontal way.
- Move the tail to the side, and twister gently rotate to the vertical position, while tucking the strands.
- Pulling the twister to the top, turn it so that the curls are turned inward.
- After the strands are completely wrapped, the tips must be hidden and the twister returned back to the horizontal position.
- That part of the barrette, which will be longer, must be hidden inside the shell, and the short one fixed on the surface of the volume section.
Hairstyles for long hair with cheagami hairpins have many options that diversify your image:
- Collect the hair in the tail, put it between the stripes heagami. Spread the strands over the entire length of the strips and clamp. Lower the cheagami to the ends of the strands, tuck them inward and twirl the curls into a bun. With the tips of the hagas, bring them up to the top, then tuck in to make an even ring.
- Comb the head of hair back and divide it into two equal half by the occipital zone.. Fix it with one cheagami, spreading the strands on the surface wind them on the hairpin. The second part of the locks collect in the tail and fix it inside the stranded beam with cheagami.
It turns out that the tail will be inside the ringlet.
Variations of styling with heagami
- Do the previous step of creating the tail in the ringlet.. Take additional cheagami, and wind the tail on it to the very base. Fix the tips of the hairpin on both sides of the already created ring, and evenly distribute the strands on the surface of the hairpin.
Hairstyles come out very interestingly with a hairpin and homemade hair clip, all because such an accessory has an original design. It consists of two metal scallops, which are interconnected by strong, elastic threads.
Easy Home - very easy to use. The whole principle is that with one part of the comb hook on the locks on one side, and the second - with the reverse. So the curls will be securely fixed, while everything is held tight, without causing pain and discomfort.
Izi home you will spend a minimum of effort to create elegant styling
With such a barrette, you can safely lie down, for example, when traveling for many hours, when you just want to relax a bit in the passenger seat, or when relaxing on the beach.
For example, it is unlikely that you will be able to lie down with a “crab”, it will press hard and interfere, and your home is the opposite - the hairpin is practical and as comfortable as possible. If you are looking for a suitable option to create a hairstyle with barrettes for short hair, then iz home, in this case, the best way possible.
- Locks gather in the desired shape, for example, asymmetric or shell.
- Attach one part of the barrette to the right of the created styling.
- Slowly pull the second part and secure it to the left.
- Sometimes, to create more intricate patterns, izi home twist.
Beautiful curls without pleyk and irons. it is possible!
Hello!
I want to devote this review to my magic wand for all occasionsI am familiar with this device for quite a long time, probably 9-10 years old, but what is this thing called, I haven’t known all this time. And just a few weeks ago, climbing through the expanses of the Internet, I stumbled upon such a thing as the Twister, and when I went to the site, I was surprised to see my favorite deviceAnd so, let's get acquainted - Twister, as it is
I have three of themThe two most battered ones are my very first twisters. I use this kind of twister, for me it is more convenient.
In the middle is a solid wire that allows you to twist-twirl our twister.


To create a gulka, I use 2 options:
1. I push my hair through a hole in the twister (as with a regular rubber band when tying the tail).
2. Somewhere at a distance of 5 cm from the roots, I roll the hair twister (this is very easy to do)
3. After the first scrolling of hair, I begin to gently pull the twister to the ends of the hair (it is easy to do it), the main thing is to pull the twister not down, but as if pulling away from the head, parallel to the place of our future bun (I hope you understand the point, how to explain)).
4. And starting from the ends we twirl the hair onto the twister right up to the roots.
5.We twist the ends of the twister and get a bun.
Option II:
This option is much simpler than the previous one.
1. Tie the tail.
2. We pull the tips of the hair into the hole of the twister and twist with the tips of the twister.
3. Next, just wrap the twister in the direction of the base of our tail.
4. Already near the gum we bend the twister.
5. The remaining ends of the twister are simply wrapped around the bun.

I constantly make such a flyer on trips (my hair just does not interfere on the road), for jogging, and that can be done as an everyday haircut.
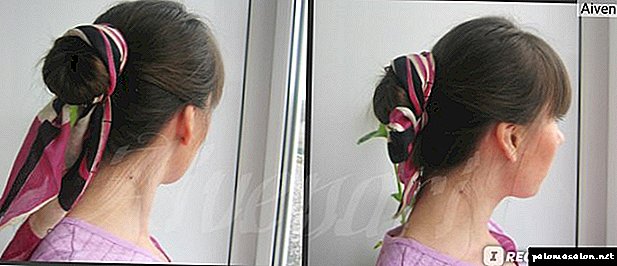
If desired, you can decorate the bun with a small kerchief.
My technique for curls:
1. I do the usual tail.
2. I apply the twister to the base of the tail and begin to twist the tail around the twister.
3. So we wind all the hair right up to the ends (such as a spiral).
4. Carefully fold the twister.
5. The remaining ends of the twister are wrapped around the resulting bun.


Curls can be done on the 2nd technique for the bun, but the curls are not so beautiful.
Tips:
1. In order to make the curls more beautiful and last longer, I initially moisturize my hair with water or spray (at the moment I make sprays of decoction and essential oils, because it is still useful). At this stage, the main thing is not to overdo it with liquid, otherwise the hair will dry out for a long time.
2. If you want to speed up the process of drying hair (or overdo it with moisture), you can use a hairdryer. Just dry the bun, not dissolving it, otherwise the locks will lose their shape.
3. If you have already begun to unwind the bun, and only at this stage you realized that your hair is wet - carefully wrap the bun and return it with a hairdryer.
You can buy such a thing in stores or on the market where all sorts of hair accessories are sold.
Cost of Twister from 10 to 20 UAH (up to 100 rub.)
A lush and beautiful bun also turns out with a bagel for hair.
I hope the review was helpfulThanks for attention
Hairstyles with patch strands
Hairstyles from the hair on the hairpins will help to give the missing length and pomp. This option is especially relevant for evening and wedding styling. Overhead strands will give femininity and sexuality to the whole image, while not resorting to complex and expensive building procedures.
So, the classic version of the hairstyle for hair with hairpins can be Greek. It is always appropriate, as for a wedding, and for any other celebrations.
Note! In order for overhead strands on hairpins to look as attractive as possible, it is important to choose the right color and to properly care for them. Do not forget to wash the curls with shampoo, and apply a caring balm.
Great look gorgeous Hollywood hair or a gentle wave with false straps that will give even more luxury and showiness. If you want to look elegant, feminine and gorgeous, then to the hairstyle with overhead strands, also add some nice accessory - a bezel with rhinestones, a small flower, etc. Such styling options will be relevant for going to a restaurant, and going to the theater, and for the prom.

Charming styling of the bride using overhead strands
For everyday use, you can weave artificial strands in a braid. For example, a slightly loose spike and a long braid will give a girl tenderness and romance. No less interesting and looks lush ponytail, which for a change can be placed on the side.
Note! To overlay the strands well kept on native hair, before fixing natural curls nasheshite at the root.
As you can see, you can make an attractive look to curls using very simple methods. It is only important to choose an interesting hairpin and use it correctly. A little imagination and sleight of hand, and - voila - the original and lively hairstyle is ready.
The video in this article will tell about additional original ways to create hairstyles using different hairpins.
Simple hairstyles with hair twister
 Light hairstyles for medium length hair
 Hairstyles for thick hair of medium length
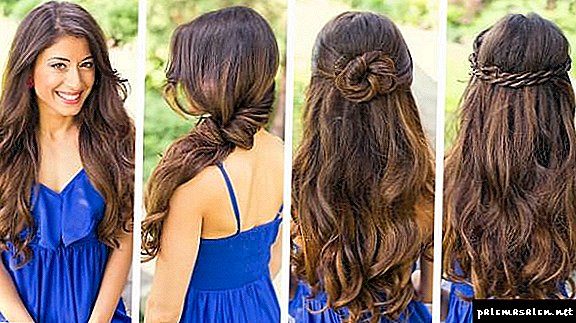 Hairstyle for loose hair of medium length
 Hairstyles for flowing hair of medium length
 How beautiful to curl hair of medium length
 Hairstyle sesson on medium hair
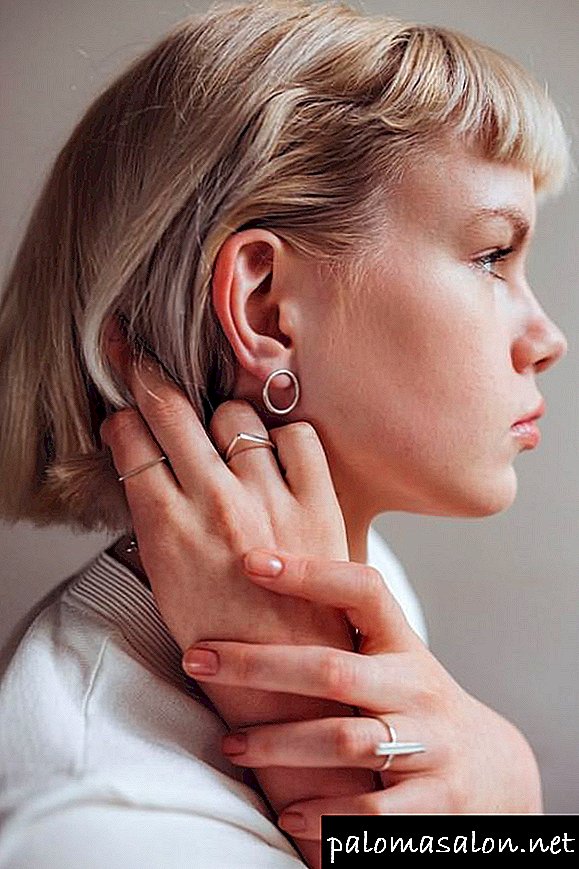 Beautiful hairstyles for short hair photo
 Hairstyles with weaving for short hair
 Hairstyles curls on medium hair photo
 Hairstyles asymmetry on medium hair photo
 Braided hairstyles for long hair
 Hairstyles for long hair photo everyday